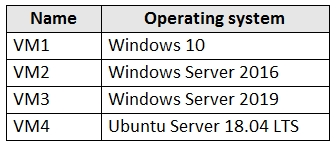
You have an Azure subscription that contains the Azure virtual machines shown in the following table. You create an MDM Security Baseline profile named Profile1. You need to identify to which virtual machines Profile1 can be applied. Which virtual machines should you identify?
SIMULATION - You need to ensure that connections from the Internet to VNET1\subnet0 are allowed only over TCP port 7777. The solution must use only currently deployed resources. To complete this task, sign in to the Azure portal.
You need to configure the Network Security Group that is associated with subnet0. 1. In the Azure portal, type Virtual Networks in the search box, select Virtual Networks from the search results then select VNET1. Alternatively, browse to Virtual Networks in the left navigation pane. 2. In the properties of VNET1, click on Subnets. This will display the subnets in VNET1 and the Network Security Group associated to each subnet. Note the name of the Network Security Group associated to Subnet0. 3. Type Network Security Groups into the search box and select the Network Security Group associated with Subnet0. 4. In the properties of the Network Security Group, click on Inbound Security Rules. 5. Click the Add button to add a new rule. 6. In the Source field, select Service Tag. 7. In the Source Service Tag field, select Internet. 8. Leave the Source port ranges and Destination field as the default values (* and All). 9. In the Destination port ranges field, enter 7777. 10.Change the Protocol to TCP. 11.Leave the Action option as Allow. 12.Change the Priority to 100. 13.Change the Name from the default Port_8080 to something more descriptive such as Allow_TCP_7777_from_Internet. The name cannot contain spaces. 14.Click the Add button to save the new rule.
Question 163
SIMULATION - You need to prevent administrators from performing accidental changes to the Homepage app service plan. To complete this task, sign in to the Azure portal.
You need to configure a 'lock' for the app service plan. A read-only lock ensures that no one can make changes to the app service plan without first deleting the lock. 1. In the Azure portal, type App Service Plans in the search box, select App Service Plans from the search results then select Homepage. Alternatively, browse to App Service Plans in the left navigation pane. 2. In the properties of the app service plan, click on Locks. 3. Click the Add button to add a new lock. 4. Enter a name in the Lock name field. It doesn't matter what name you provide for the exam. 5. For the Lock type, select Read-only. 6. Click OK to save the changes.
Question 164
SIMULATION - You need to ensure that a user named Danny1234578 can sign in to any SQL database on a Microsoft SQL server named web1234578 by using SQL Server Management Studio (SSMS) and Azure Active Directory (Azure AD) credentials. To complete this task, sign in to the Azure portal.
You need to provision an Azure AD Admin for the SQL Server. 1. In the Azure portal, type SQL Server in the search box, select SQL Server from the search results then select the server named web1234578. Alternatively, browse to SQL Server in the left navigation pane. 2. In the SQL Server properties page, click on Active Directory Admin. 3. Click the Set Admin button. 4. In the Add Admin window, search for and select Danny1234578. 5. Click the Select button to add Danny1234578. 6. Click the Save button to save the changes. Reference: https://docs.microsoft.com/en-us/azure/azure-sql/database/authentication-aad-configure?tabs=azure-powershell
Question 165
SIMULATION - You need to configure a Microsoft SQL server named Web1234578 only to accept connections from the Subnet0 subnet on the VNET01 virtual network. To complete this task, sign in to the Azure portal.
You need to allow access to Azure services and configure a virtual network rule for the SQL Server. 1. In the Azure portal, type SQL Server in the search box, select SQL Server from the search results then select the server named web1234578. Alternatively, browse to SQL Server in the left navigation pane. 2. In the properties of the SQL Server, click Firewalls and virtual networks. 3. In the Virtual networks section, click on Add existing. This will open the Create/Update virtual network rule window. 4. Give the rule a name such as Allow_VNET01-Subnet0 (it doesn't matter what name you enter for the exam). 5. In the Virtual network box, select VNET01. 6. In the Subnet name box, select Subnet0. 7. Click the OK button to save the rule. 8. Back in the Firewall / Virtual Networks window, set the Allow access to Azure services option to On.
Question 166
You have Azure Resource Manager templates that you use to deploy Azure virtual machines. You need to disable unused Windows features automatically as instances of the virtual machines are provisioned. What should you use?
The primary use case for the Azure Desired State Configuration (DSC) extension is to bootstrap a VM to the Azure Automation State Configuration (DSC) service. The service provides benefits that include ongoing management of the VM configuration and integration with other operational tools, such as Azure Monitoring. Using the extension to register VM's to the service provides a flexible solution that even works across Azure subscriptions. Reference: https://docs.microsoft.com/en-us/azure/virtual-machines/extensions/dsc-overview
Question 167
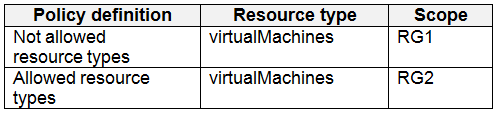
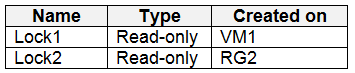
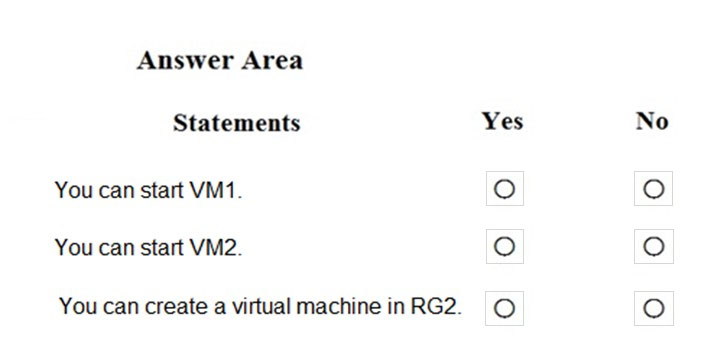
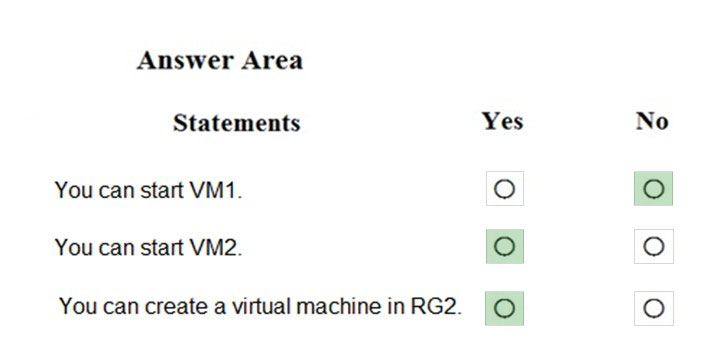
HOTSPOT - You have an Azure subscription that contains the virtual machines shown in the following table. You create the Azure policies shown in the following table. You create the resource locks shown in the following table. For each of the following statements, select Yes if the statement is true. Otherwise, select No. NOTE: Each correct selection is worth one point. Hot Area:
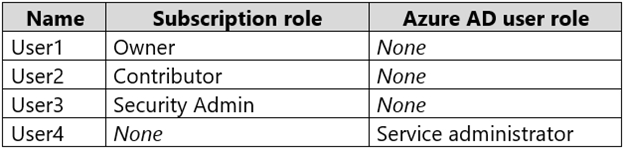
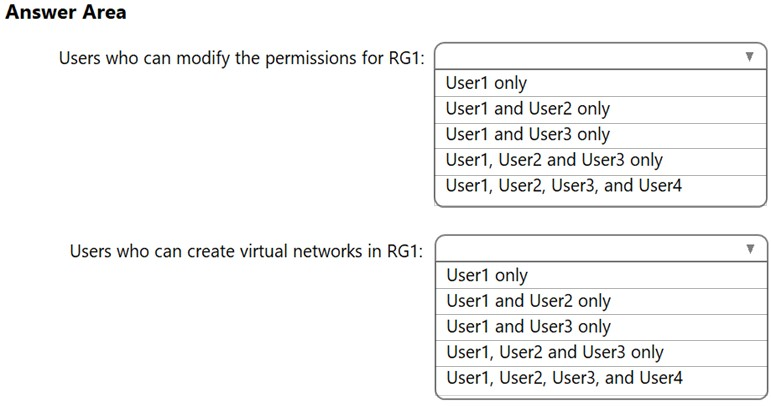
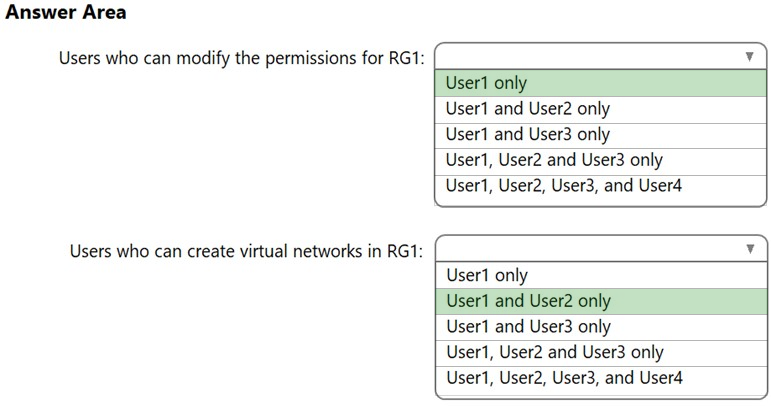
HOTSPOT - You have an Azure subscription that contains an Azure Active Directory (Azure AD) tenant named contoso.com. The tenant contains the users shown in the following table. You create a resource group named RG1. Which users can modify the permissions for RG1 and which users can create virtual networks in RG1? To answer, select the appropriate options in the answer area. NOTE: Each correct selection is worth one point. Hot Area:
Box 1: Only an owner can change permissions on resources. Box 2: A Contributor can create/modify/delete anything in the subscription but cannot change permissions.
Question 169
SIMULATION - You need to configure network connectivity between a virtual network named VNET1 and a virtual network named VNET2. The solution must ensure that virtual machines connected to VNET1 can communicate with virtual machines connected to VNET2. To complete this task, sign in to the Azure portal and modify the Azure resources.
You need to configure VNet Peering between the two networks. The questions states, "The solution must ensure that virtual machines connected to VNET1 can communicate with virtual machines connected to VNET2". It doesn't say the VMs on VNET2 should be able to communicate with VMs on VNET1. Therefore, we need to configure the peering to allow just the one-way communication. 1. In the Azure portal, type Virtual Networks in the search box, select Virtual Networks from the search results then select VNET1. Alternatively, browse to Virtual Networks in the left navigation pane. 2. In the properties of VNET1, click on Peerings. 3. In the Peerings blade, click Add to add a new peering. 4. In the Name of the peering from VNET1 to remote virtual network box, enter a name such as VNET1-VNET2 (this is the name that the peering will be displayed as in VNET1) 5. In the Virtual Network box, select VNET2. 6. In the Name of the peering from remote virtual network to VNET1 box, enter a name such as VNET2-VNET1 (this is the name that the peering will be displayed as in VNET2). There is an option Allow virtual network access from VNET to remote virtual network. This should be left as Enabled. 7. For the option Allow virtual network access from remote network to VNET1, click the slider button to Disabled. 8. Click the OK button to save the changes. Reference: https://docs.microsoft.com/en-us/azure/virtual-network/virtual-network-manage-peering
Question 170
SIMULATION - You need to deploy an Azure firewall to a virtual network named VNET3. To complete this task, sign in to the Azure portal and modify the Azure resources. This task might take several minutes to complete. You can perform other tasks while the task completes.
To add an Azure firewall to a VNET, the VNET must first be configured with a subnet named AzureFirewallSubnet (if it doesn't already exist). Configure VNET3. 1. In the Azure portal, type Virtual Networks in the search box, select Virtual Networks from the search results then select VNET3. Alternatively, browse to Virtual Networks in the left navigation pane. 2. In the Overview section, note the Location (region) and Resource Group of the virtual network. We'll need these when we add the firewall. 3. Click on Subnets. 4. Click on + Subnet to add a new subnet. 5. Enter AzureFirewallSubnet in the Name box. The subnet must be named AzureFirewallSubnet. 6. Enter an appropriate IP range for the subnet in the Address range box. 7. Click the OK button to create the subnet. Add the Azure Firewall. 1. In the settings of VNET3 click on Firewall. 2. Click the Click here to add a new firewall link. 3. The Resource group will default to the VNET3 resource group. Leave this default. 4. Enter a name for the firewall in the Name box. 5. In the Region box, select the same region as VNET3. 6. In the Public IP address box, select an available public IP address if one exists, or click Add new to add a new public IP address. 7. Click the Review + create button. 8. Review the settings and click the Create button to create the firewall. Reference: https://docs.microsoft.com/en-us/azure/firewall/tutorial-firewall-deploy-portal