• Home
  • Exams
    Microsoft
    AI-102 (Designing and Implementing) AI-900 (AI Fundamentals) AZ-104 (Administrator) AZ-140 (Configuring and Operating) AZ-204 (Developing Solutions) AZ-305 (Designing Infrastructure Solutions) AZ-400 (DevOps Solutions) AZ-500 (Security Technologies) AZ-700 (Designing and Implementing)
    All Microsoft Exams
    Amazon
    CLF-C01 (Cloud Practitioner) DBS-C01 (Database - Specialty) DVA-C01 (Developer Associate) SCS-C01 (Security - Specialty) SAA-C02 (Solutions Architect Associate) SAA-C03 (Solutions Architect Associate) SAP-C01 (Solutions Architect Professional) SOA-C02 (Certified SysOps Administrator Associate) DOP-C01 (DevOps Engineer Professional)
    All Amazon Exams
    Cisco
    200-201 (CBROPS) 200-301 (CCNA) 200-901 (DEVASC) 300-410 (ENARSI) 300-415 (ENSDWI) 300-420 (ENSLD) 300-425 (ENWLSD) 300-430 (ENWLSI) 300-715 (SISE) 350-401 (ENCOR) 350-501 (SPCOR) 350-601 (DCCOR) 350-701 (SCOR) 350-801 (CLCOR) 400-007 (CCDE)
    All Cisco Exams
    CompTIA
    220-1101 (A+ Core 1) 220-1102 (A+ Core 2) CAS-004 (Advanced Security Practitioner) CS0-002 (CySA+) CV0-003 (Cloud+) FC0-U61 (IT Fundamentals) N10-008 (Network+) PK0-004 (Project+) PT0-002 (PenTest+) SK0-005 (Server+) SY0-601 (Security+) XK0-004 (Linux+)
    All CompTIA Exams
    Google
    Associate Cloud Engineer Cloud Digital Leader Professional Cloud Architect Professional Cloud Security Engineer Professional Data Engineer
    All Google Exams
    Huawei
    H11-851 (HCNA-VC) H12-211 (HCIA Routing&Switching) H12-221 (HCNP-RS-IERN) H12-224 (HCNP-RS Fast Track) H12-711 (HCNA-Security-CBSN) H13-612 (HCNA-Storage-BSSN) H13-629 (HCIE-Storage)
    All Huawei Exams
    Python
    Python Programming (PCAP)
    All Python Exams
    Juniper
    JN0-104 (JNCIA-Junos) JN0-251 (JNCIA-MistAI)
    All Juniper Exams
    Fortinet
    NSE4_FGT-7.0 (FortiOS 7.0) NSE4_FGT-7.2 (FortiOS 7.2) NSE5_FAZ-7.0 (FortiAnalyzer 7.0) NSE5_FCT-7.0 (FortiClient EMS 7.0) NSE5_FMG-7.0 (FortiManager 7.0) NSE7_EFW-7.0 (Enterprise Firewall 7.0) NSE7_SDW-7.0 (SD-WAN 7.0 ) NSE8_812 (Written Exam)
    All Fortinet Exams
  • LabsNew
    CCNA 200-301
    Introduction IOS Operating System IPv4 Address Configure Serial and Loopback Interfaces IPv6 Address Configuration, Verification, and Troubleshooting IPv6 Address Autoconfiguration and EUI-64 Understanding ARP and Proxy ARP Configuring Standard VLANs Configuring VTP Clients and Servers Configuring VTP Transparent Mode Securing VTP Domains Switch Access Port Security Advanced Switch Access Port Security Advanced Static Switch Access Port Security Disabling Auto-negotiation of Trunking Configuring Dynamic Trunking Configuring Default Gateways Cisco Discovery Protocol (CDP) Configuring LLDP on Cisco Devices Configuring Errdisable Recovery Configuring Inter-VLAN Routing with Router on a Stick (RoaS) Inter-VLAN Routing Using Switched Virtual Interfaces (SVI) Configuring Static Routing via Ethernet Interfaces Configuring Static Routing via IP addresses Configuring and Naming Static Routes Configuring Default Static Routes Configuring IPv6 Static Routes Configuring IPv6 Default Routes Configuring IP Floating Static Routes Configuring RIP Version 2 RIPv2 Network Summarization Configuration
  • ToolboxNew
    IPv4 Subnet Calculator
    IPv4 Wildcard Mask Calculator
    HTML Encoder and Decoder
    URL Encoder and Decoder
    Random Password Generator
  • Net Sec ToolsNew
    Cisco Packet Tracer
    GNS3
    EVE-NG
    Wireshark
    Postman
    Nmap
    Curl
    Nessus
    Burp Suite
  • Sign Up
  • Login

  • Logo

    Labs

    • Lab 1: Introduction to CISCO 200-301 Labs
    • Lab 2: Cisco IOS Operating System
    • Lab 3: IPv4 Address Configuration, Verification, and Troubleshooting on Cisco Routers
    • Lab 4: IPv6 Address Configuration, Verification, and Troubleshooting on Cisco Routers
    • Lab 5: IPv6 Address Autoconfiguration and EUI-64 Addressing on Cisco Routers
    • Lab 6: Understanding ARP and Proxy ARP on Cisco Routers
    • Lab 7: Configuring Standard VLANs on Catalyst Switches
    • Lab 8: Configuring VTP Clients and Servers on Cisco Catalyst Switches
    • Lab 9: Configuring VTP Transparent Mode on Cisco Catalyst Switches
    • Lab 10: Securing VTP Domains on Cisco Catalyst Switches
    • Lab 11: Configuring Switch Access Port Security on Cisco Catalyst Switches
    • Lab 12: Configuring Advanced Switch Access Port Security on Cisco Catalyst Switches
    • Lab 13: Configuring Advanced Static Switch Access Port Security on Cisco Catalyst Switches
    • Lab 14: Disabling Auto-negotiation of Trunking on Cisco Catalyst Switches
    • Lab 15: Configuring Dynamic Trunking on Cisco Switchports
    • Lab 16: Configuring Default Gateways for Cisco Routers and Switches
    • Lab 17: Understanding Cisco Discovery Protocol (CDP)
    • Lab 18: Configuring LLDP on Cisco Devices
    • Lab 19: Configuring Errdisable Recovery on Cisco Switches
    • Lab 20: Configuring Inter-VLAN Routing with Router on a Stick (RoaS)
    • Lab 21: Configuring Inter-VLAN Routing Using Switched Virtual Interfaces (SVI)
    • Lab 22: Configuring Static Routing via Ethernet Interfaces on Cisco Routers
    • Lab 23: Configuring Static Routing via IP addresses
    • Lab 24: Configuring and Naming Static Routes on Cisco Routers
    • Lab 25: Configuring Default Static Routes on Cisco Routers
    • Lab 26: Configuring IPv6 Static Routes on Cisco Routers
    • Lab 27: Configuring IPv6 Default Routes on Cisco Routers
    • Lab 28: Configuring IP Floating Static Routes on Cisco Routers
    • Lab 29: Configuring RIP Version 2 on Cisco Routers
    • Lab 30: RIPv2 Network Summarization Configuration on Cisco Routers

    Cisco IOS Operating System

    Lab Overview

    This lab explores basic navigation of the Cisco IOS operating system CLI (Command Line Interface). Only a single device is required. This is a guided walkthrough of the IOS command line interface.

    Step-by-Step Instructions

    1- Initial Setup

    1. Open Cisco Packet Tracer.
    2. Drag and drop the Router 2911 as shown in the below screenshot:
    Router Setup 1

    2- Accessing the CLI

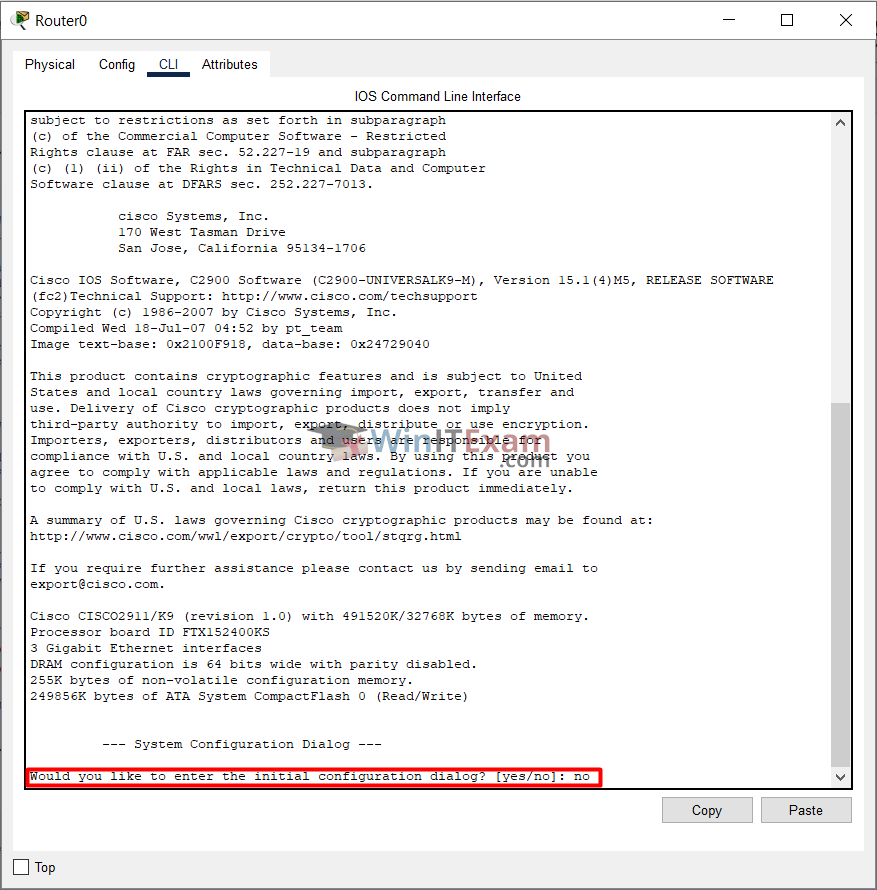
    1. Click on Router0 and then the CLI tab to access the console.
    2. Router Setup 2
    3. If prompted to enter the initial configuration dialog after the device has booted up, enter ‘no’.
    4. Router Setup 3
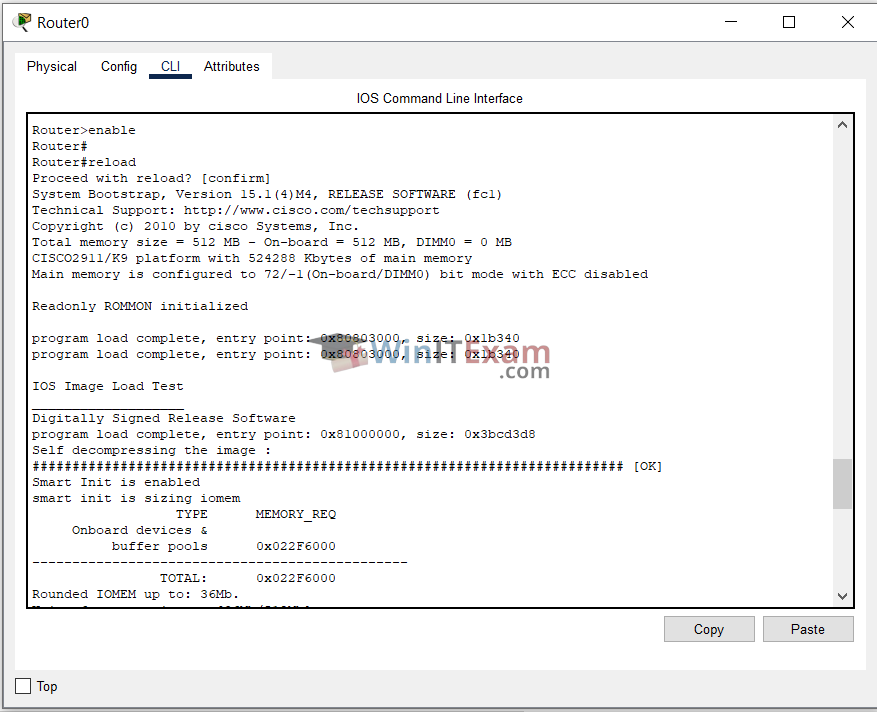
    5. Press Enter to get started, then use the command “enable” to enter Privileged Exec mode.
      For rebooting the device, use the command “reload”.
    6. Router Setup 4

    3- Understanding Modes

    • User Exec Mode: The symbol “>” in “Router>enable” means that we are in user Exec mode.
    • Privileged Exec Mode: The symbol “#” in “Router#” means that we are in privileged Exec mode.

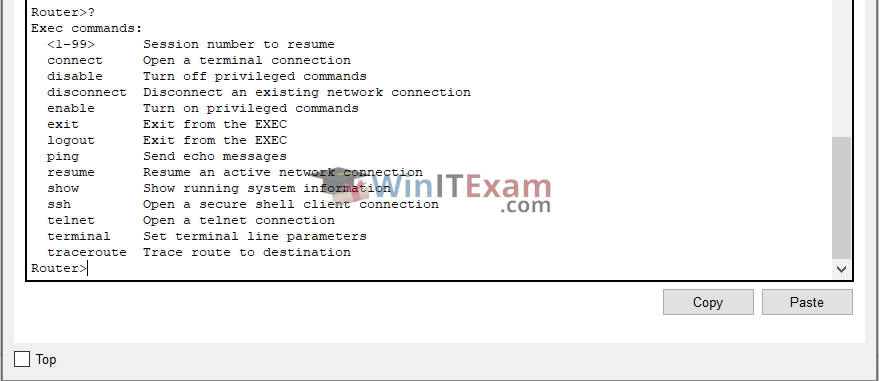
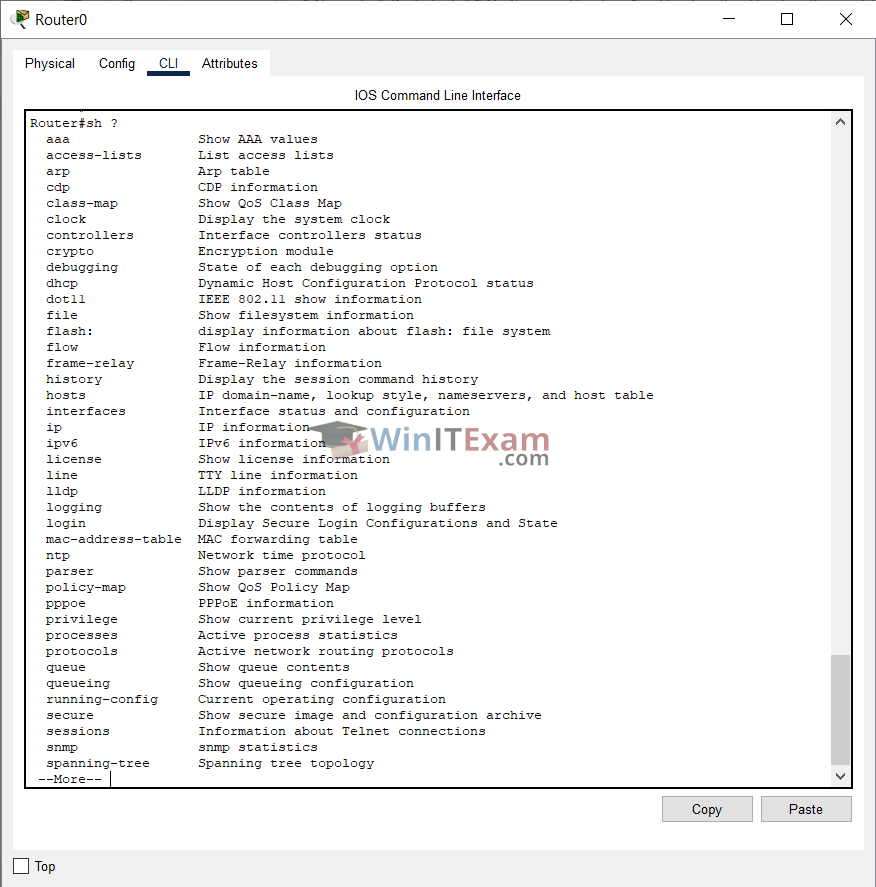
    4- User Exec Mode and CLI Command Help

  • Enter a question mark “?” to explore the commands available in User Exec mode.
  • Router Setup 5
  • Attempt to run a command not available in User Exec mode (e.g., ‘show startup-config’).
  • Router Setup 6

    5- Privileged Exec (Enable) Mode and Context Sensitive Help

  • Enter Privileged Exec mode. This mode is often commonly known as Enable mode. Notice that the prompt changes to ‘Router#’
  • Router>enable
    Router#
  • Back to User Exec mode by using the command disable.
  • Router#disable
    Router>
  • Go back to Privileged Exec mode by using shortened command abbreviation.
  • Router>en
    Router#

    6- Command Abbreviation and Context Sensitive Help

  • Command abbreviation only works when you enter letters which could only match one unique command. Attempt to return to User Exec mode by entering the command di
  • Router#di
    % Ambiguous command: "di"
  • Check to see all the possible commands which begin with the letters di
  • Router#di?
    dir disable disconnect
  • We can see that the shortest combination we could use for Disable would be disa
  • We can access detailed informational and debug output in Privileged Exec mode. Check to see all commands that begin with sh
  • Router#sh?
    show
  • show is the only command that begins with sh so we can use that as the abbreviation.
  • Enter sh ? to see all available show commands. Notice that we have now included a space before the question mark. This enters context sensitive help for the show command.
  • Router Setup 7

    7- Using Tab Completion and Error Handling

  • Press the Enter key when you see --Mor-- to cycle through the additional output one line at a time.
  • One line at a time is a very slow way to view additional output so press the Space Bar to cycle through it one page at a time instead.
  • Keep hitting the Space Bar until you reach the end of the output.
  • Explore available options for the show aaa command. The term aaa is used for illustration purposes only, and the specific commands under aaa are not relevant for this exercise.
  • Router Setup 8
  • Enter sh aaa us and then hit the Tab key to see Tab completion in action.
  • The Tab key will complete a partially entered command for you. Again this will only work if you’ve entered enough letters to be a unique match.
  • Router#sh aaa us
    Router#sh aaa user
  • Enter the command sh aaa user all.
  • Router#sh aaa user all
    Router#
  • Note the absence of output upon entering the command. This is expected behavior indicating that AAA configuration is not set up. The CLI returns to the Enable prompt as there is no information to display.
  • Upon entering the command sh aaa usor all
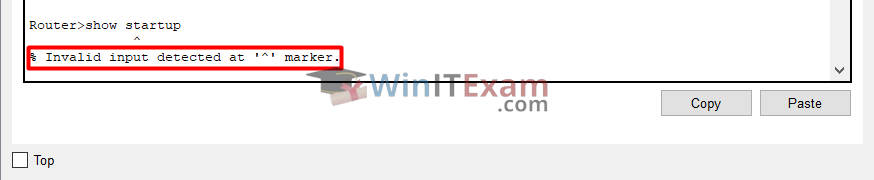
  • Router#sh aaa usor all
    ^
    % Invalid input detected at '^' marker.
  • If you input an incorrect command, an error message will be displayed.
  • In this case, a typographical error was made. The CLI indicates that invalid input was detected and highlights the location of the error, specifically at the 'o' in 'usor', where 'user' should have been typed instead.
  • To correct this, enter the command sh aaa and press Enter.
  • Router#sh aaa
    % Incomplete command.
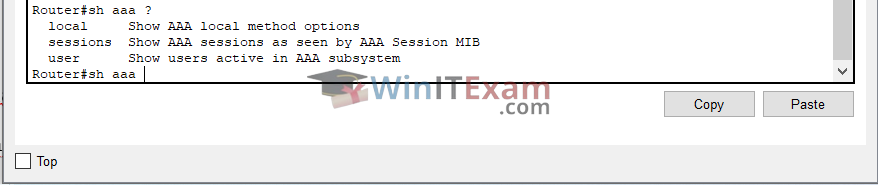
  • The router alerts us that the command entered is incomplete and requires additional input. To view the available options, we can re-enter sh aaa ?.
  • Router#sh aaa ?
    local Show AAA local method options
    sessions Show AAA sessions as seen by AAA Session MIB
    user Show users active in AAA subsystem

    8- Global Configuration Mode

  • Enter Global Configuration mode. (The command can be abbreviated to conf t.)
  • Router#configure terminal
    Enter configuration commands, one per line. End with CNTL/Z.
    Router(config)#
  • Upon entering the command, observe the prompt change to Router(config)#.
  • Global Configuration mode allows configuration changes that affect the entire device, rather than specific interfaces or features.
  • Let's add a few host entries. (The specific function of this command is not critical for this demonstration; we will use it to illustrate command history shortly.)
  • Router(config)#ip host Server1 1.1.1.1
    Router(config)#ip host Server2 2.2.2.2
  • Attempt to change the device's hostname to R1 by typing the command hostname R1.
  • Router(config)#hostname R1
    R1(config)#
  • Observe how the command prompt updates to display the router’s hostname.
  • Use the Up Arrow key multiple times to navigate through your recent command history, and then use the Down Arrow to revisit previous commands. Note that command history is limited to your current command level – only commands entered in Global Configuration mode will be displayed.
  • Execute the command show ip interface brief to examine the available interfaces on the router.

  • R1(config)#show ip interface brief
    ^
    % Invalid input detected at '^' marker.
  • When receiving the invalid input detected error message despite no typos, it's likely due to entering commands in the wrong mode. Commands like show should be executed in Privileged Exec mode, not Global Configuration mode. To override this, prepend do to the command do show regardless of your current mode to execute show commands correctly and view available interfaces.
  • Please enter the correct command to check available interfaces from Global Configuration mode.
  • R1(config)#do show ip interface brief 
    Interface IP-Address OK? Method Status Protocol
    GigabitEthernet0/0 unassigned YES unset administratively down down
    GigabitEthernet0/1 unassigned YES unset administratively down down
    GigabitEthernet0/2 unassigned YES unset administratively down down
    Vlan1 unassigned YES unset administratively down down

    9- Interface Configuration Mode

  • Enter Interface Configuration mode for one of your interfaces.
  • R1(config)#interface gigabitEthernet 0/0
    R1(config-if)#
  • Upon entering Interface Configuration mode, you'll notice a prompt change indicating your current mode.
  • To return to Global Configuration mode, simply use the command exit.
  • R1(config-if)#exit
    R1(config)#
  • Drop all the way back down to Privilege Exec mode with a single command.
  • R1(config-if)#end
    R1#
  • The command end allows you to revert to Privilege Exec mode from any operational level. Alternatively, pressing Ctrl-C achieves the same effect.
  • To view the complete device configuration, execute the command show running-config.
  • R1#show running-config 
    Building configuration...
    Current configuration : 687 bytes
    !
    version 15.1
    no service timestamps log datetime msec
    no service timestamps debug datetime msec
    no service password-encryption
    !
    hostname R1
    !
    !
    !
    !
    !
    !
    !
    !
    no ip cef
    no ipv6 cef
    !
    !
    !
    !
    license udi pid CISCO2911/K9 sn FTX152457FX
    !
    !
    !
    !
    !
    !
    !
    !
    !
    !
    !
    spanning-tree mode pvst
    !
    !
    !
    !
    !
    interface GigabitEthernet0/0
    no ip address
    duplex auto
    speed auto
    shutdown
    !
    interface GigabitEthernet0/1
    no ip address
    duplex auto
    speed auto
    shutdown
    !
    interface GigabitEthernet0/2
    no ip address
    duplex auto
    speed auto
    shutdown
    !
    interface Vlan1
    no ip address
    shutdown
    !
    ip classless
    !
    ip flow-export version 9
    !
    !
    !
    !
    !
    !
    !
    line con 0
    !
    line aux 0
    !
    line vty 0 4
    login
    !
    !
    !
    end

    10- Viewing and Filtering Configuration

  • note that the iOS command line is generally case-insensitive, except when commands are piped.
  • R1#sh run | begin Hostname 
    R1#
  • Here, we entered 'Hostname' with an initial capital letter, but in the configuration, it appears in lowercase. Consequently, the router did not locate any instances of 'Hostname' and returned no results.
  • To view configuration lines containing the keyword 'interface'
  • R1#sh run | include interface
    interface GigabitEthernet0/0
    interface GigabitEthernet0/1
    interface GigabitEthernet0/2
    interface Vlan1
  • View all configuration lines which do not include the word ‘interface’.
  • R1#sh run | exclude interface
    Building configuration...

    Current configuration : 737 bytes
    !
    version 15.1
    no service timestamps log datetime msec
    no service timestamps debug datetime msec
    no service password-encryption
    !
    hostname R1
    Output truncated –

    11- IOS Configuration Management

  • Copy the running configuration to the startup configuration.
  • R1#copy run start
    Destination filename [startup-config]?
    Building configuration...
    [OK]
  • Change the hostname of the router to RouterX
  • R1#config t
    R1(config)#hostname RouterX
    RouterX(config)#
  • Note that commands executed in IOS take immediate effect, evidenced by the prompt changing to reflect the new hostname.
  • To determine the hostname that will be applied upon system reboot
  • RouterX(config)#do show startup-config
    Using 690 bytes
    !
    version 15.1
    no service timestamps log datetime msec
    no service timestamps debug datetime msec
    no service password-encryption
    !
    hostname RouterX
    !
    !
    !
  • Commands take effect immediately but are not persistent across a reboot until we save them.
  • Backup the current running configuration to flash memory in the router using the command copy run flash:.
  • RouterX#copy run flash:
    Destination filename [running-config]?
    Building configuration...
    [OK]
  • It's not advisable to back up a device to itself. Instead, execute the command to backup the running configuration to an external TFTP server.
  • RouterX#copy run tftp
    Address or name of remote host []? 10.10.10.10
    Destination filename [RouterX-confg]?

    Writing running-config........
    %Error opening tftp://10.10.10.10/RouterX-confg (Timed out)
  • The command attempted to execute for a period but eventually timed out and failed due to the absence of configured connectivity to a TFTP server in the lab environment
  • After reloading the device, verify it restarts with the anticipated configuration displaying the hostname "RouterX".
  • RouterX#reload
    Proceed with reload? [confirm]

    Conclusion

    This lab provided a comprehensive introduction to navigating and using the Cisco IOS operating system. From basic command execution to configuration management, these steps lay the foundation for more advanced networking tasks.

    By following this guide, you will gain a solid understanding of the Cisco IOS CLI, enabling you to effectively manage and troubleshoot Cisco devices in your network.

    © 2025 WinITExam.com
    Terms | Privacy | Refund | Contact